JavaScript and Radio Button Values

Sometimes I have to work on JavaScript code and it’s not something I really like much (why? well… 😉 ).

Ok, so some days ago I had to read the value of a currently selected radio button. And that’s not really trivial, it requires some lines of code, e.g., iterating over all radio buttons and checking each one if it has its checked flag set. And then reading the value of the checked element’s value attribute. Well, it’s a pain…

And then I found out (I read a hint on some other blog, unfortunately don’t remember the URL) how reading the value can be done easily in just one line of code. Great ;-).

You have to use prototype for this:

var selectedValue = $$('input:checked[type="radio"][name="radioName"]').pluck('value');

$$ is prototype’s CSS selector function. In the example, all checked HTML input elements with type=”radio” and name=”radioName” will be returned by this function. As there’s actually always just one radio element selected at a time, the function returns just one element of which the attribute value can be read directly.

So, now that’s easy. Just a little bit hard to remember if you rarly use JavaScript, like me. I’m sure in half a year I’ll not remember how it worked. That’s why I wrote this blog entry… ;-).
Changing Default Java Version on OS X

OS X comes with Java support already included – current versions of OS X 10.5 have Java 1.3, 1.4, 1.5 and 1.6 installed. By default, Java 1.5 is currently the active version (on OS X 10.5.6).

Java is installed under /System/Library/Frameworks/JavaVM.framework. Folder Versions contains various Java versions and links to them. A folder named A contains the current active default version. When switching between versions, this folder’s content is replaced.

I first thought it would be sufficient to change Current and CurrentJDK links to point to the desired Java version. In fact, it partially works, e.g., the new version is active on the Terminal afterwards. However, Java applications started from the GUI didn’t work any more (e.g., Eclipse, FreeMind, NeoOffice). In the system’s log I found entries like “[JavaAppLauncher Error] unable to find a version of Java to launch”.

If you changed these soft links and want your configuration to work again, best is to recreate them so that Current points to A and CurrentJDK points to 1.5. On the terminal, switch to /System/Library/Frameworks/JavaVM.framework/Versions and do (mind that you must enter your admin password in order to be able to do these changes):

$ sudo ln -sfh A Current
$ sudo ln -sfh 1.5 CurrentJDK

If you don’t want to use the terminal or if you somehow destroyed your Java installations, you can restore the whole JavaVM.framework directory from a recent Time Machine backup (if you have one). I tried this method out and works good and fast.

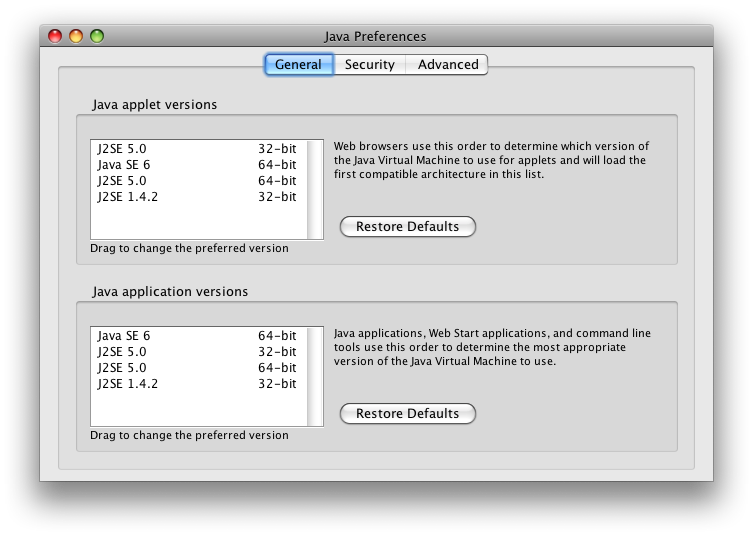
The right way to change the system’s default Java version is to use the Java Preferences application (located in Applications/Utilities/Java). If you change the order of Java versions there, the content of directory A will be changed (at least that’s what I found out – and it makes sense). This way everything works as expected and Java applications start without errors.

Here’s a screenshot of my Java Preferences: I dragged “Java SE 6” to the first place, so it became my new default Java version for applications.

If you want to read more about Java and OS X, Apple provides a good introduction here: Java Fundamentals. Choose “Java Development Guide for Mac OS X” first. It also explains some of Apple’s concepts regarding Java.

jEdit 4.3pre16 on Mac OS X with Java 1.6

jEdit is currently my favorite text editor (nice, small and good support for lots of encodings).

Until today I have been using version 4.3pre15 on OS X (10.5) with Java 1.5 as default Java version. This configuration worked good, even if I had to copy the file /System/Library/Frameworks/JavaVM.framework/Resources/MacOS/JavaApplicationStub to /Applications/jEdit.app/Contents/MacOS, remove the soft link that was there before and rename the copied file to jedit in order to make it work.

Well, now I changed my default Java version to 1.6 and jEdit didn’t start up any more. By the way, if you want to change your default Java version use the Java Preferences application located under /Applications/Utilities/Java. Everything else is risky… 😉 I’ll write another blog entry about what was my first attempt and how it failed (here it is).

So I downloaded the current version of jEdit which is 4.3pre16 and installed it (delete previous version before…). As far as I read on jEdit’s webpage, this version should run with Java 1.5 but doesn’t work with Java 1.6. It contains a “Mac OS Plugin” for Java 1.5 support. The page says that one should remove this plugin when working with Java 1.6.

Great, so the only thing to do was to find out what this plugin is and where I’d find it. It’s a jEdit plugin located in /Applications/jEdit.app/Contents/Resources/Java/jars and named MacOS.jar. After deleting this file, jEdit starts with Java 1.6 – great!

In order to delete this file, you can use Finder, go to the applications folder and right click jEdit.app (or ctrl-click if you don’t have a right mouse button) and choose “Show Package Contents” from the context menu. Then navigate down the file hierarchy Contents/Resources/Java/jars and delete MacOS.jar.

VMware Fusion and Time Machine

I’m running VMware Fusion on my Mac and, by the way, it’s really working great. Currently I have a VM with Windows 2000 Professional (I need this one for development), one with Ubuntu and one with Open Solaris.

Well, so far so good. Recently I installed version 2.0.1 of VMware Fusion (I still had version 1.1.3 before) and read in VMware’s update guide, that it’s recommended to backup virtual machines before doing so. I thought, sure, no problem – I always backup with Time Machine, so I already have an update.

After 2.0.1 was running (worked like a charm) I checked my backups and ooops, found out that I didn’t have a backup of my virtual machines! How’s that possible? Time Machine is supposed to backup my whole hard disc, the only exception is my Download folder (I manually set this exception and thus know about it).

So I did some research and found out, that it seems there was some kind of conflict between certain versions of VMware Fusion and Time Machine (Time Machine could crash virtual machines) and therefore VMware decided to exclude virtual machines from Time Machine backups. Maybe that’s a good idea, but I, as a user, didn’t know about it – that’s critical! I always thought my virtual machines would be backed up just like all other data.

Furthermore, I read that current OSX and VMware Fusion versions don’t have these “crash issues” any more. However, VMware Fusion still excludes virtual machines from backups. If you want to manually enable Time Machine backups of virtual machines, here are instructions on how to do it.

I don’t say that backing up virtual machines with Time Machine is necessary (in fact, they can be really huge…), but the way VMware excludes virtual machines from being backed up is not ok. Users should be informed about the fact that no backups are made (e.g., a warning when a new VM is created), or backups should be done by default (that’s what users would expect).

MySQL: Creating a Database

Yesterday I installed MySQL 5.1.30 on my computer. As I haven’t used MySQL before, I played a bit around with it today and read some of the online documentation.

Some basic steps are to create a new user, a new database, and assign all access rights for the new database to the new user. This is what I need to do, when installing a new program which requires a MySQL DB to store data in. All the required information can be found in the online documentation, however, here’s a summary of the steps to do:

mbp:~ gerhard$ mysql -u root -p
Enter password:
Welcome to the MySQL monitor. Commands end with ; or \g.
Your MySQL connection id is 2
Server version: 5.1.30 MySQL Community Server (GPL)

Type 'help;' or '\h' for help. Type '\c' to clear the buffer.

mysql> create user sam identified by 'samspassword';
Query OK, 0 rows affected (0.00 sec)

mysql> create database testdb;
Query OK, 1 row affected (0.00 sec)

mysql> grant all on testdb.* to 'sam';
Query OK, 0 rows affected (0.00 sec)

That’s it, just three commands to remember…

I connected to MySQL with the root user. Then created a new user “sam” with password “samspassword”. Next I created a new database named “testdb”. And in the last step I gave all rights on this database to user sam.

Afterwards, Sam can log in to his database “testdb” like this:

mbp:~ gerhard$ mysql -u sam -psamspassword testdb

MySQL on Leopard

Today I continued setting up my Mac (OS X 10.5.5) with server software. Apache is already running, as described in my previous post – next is a MySQL database.

I downloaded MySQL 5.1.30 as Mac OS X 10.5 (x86_64) package from here. Install instructions for MySQL under OS X are available on the MySQL webpage (see here), however, everything is pretty straightforward:

  1. I opened the downloaded disk image, double clicked the install package (mysql-5.1.30-osx10.5-x86_64.pkg), and ran through the installation process (can’t be easier).
  2. Next I installed the MySQL startup item (MySQLStartupItem.pkg). Again, simply click through the install process, nothing special to do.
  3. Then I opened a terminal and used the startup item to start the database with MySQLCOM start:
    mbp:~ gerhard$ sudo /Library/StartupItems/MySQLCOM/MySQLCOM start
    Password:
    Starting MySQL database server
  4. At this point, MySQL was already up and running, great. It runs with a user named “_mysql”, that’s ok, too. Next I extended my PATH environment variable, so that I can use MySQL programs from the command line.In my case (bash shell), I added PATH=$PATH:/usr/local/mysql/bin to my .profile file in my user’s home directory. /usr/local/mysql is where the installer installed MySQL.
  5. The last thing to do, is post installation setup and testing (full instructions can be found on the MySQL webpage). The following steps show all I had to do.
  6. Grant tables have already been set up during the install process, because I used the install package of MySQL.
  7. On the terminal, mysqladmin version and mysqladmin variables can be used to see information about the database. If the database is not running, these programs will show error messages.
  8. Now it’s necessary to connect to the database, remove the anonymous user (as I don’t need it…), and assign a password to the DB root user (after installation there is no password!). In this example, I set the password to “pass”. A password must be assigned for all hosts the user can connect from. Use the query select host, user from mysql.user; to find out which hosts these are (for user root) – in this example I set passwords for root@localhost and [email protected].
    mbp:~ gerhard$ mysql -u root
    Welcome to the MySQL monitor. Commands end with ; or \g.
    Your MySQL connection id is 2
    Server version: 5.1.30 MySQL Community Server (GPL)

    Type 'help;' or '\h' for help. Type '\c' to clear the buffer.

    mysql> drop user '';
    Query OK, 0 rows affected (0.00 sec)

    mysql> SET PASSWORD FOR 'root'@'localhost' = PASSWORD('pass');
    Query OK, 0 rows affected (0.00 sec)

    mysql> SET PASSWORD FOR 'root'@'127.0.0.1' = PASSWORD('pass');
    Query OK, 0 rows affected (0.00 sec)

  9. To make starting and stopping more comfortable, I added two aliases to my .profile file:
    alias startmysql='sudo /Library/StartupItems/MySQLCOM/MySQLCOM start'
    alias stopmysql='sudo /Library/StartupItems/MySQLCOM/MySQLCOM stop'

    This way, I can open a terminal and just type startmysql and stopmysql to start and stop MySQL.

That’s it – MySQL is installed and ready to be worked with.

Edit: Later I found out that there was even a preference pane item in the MySQL dmg file. Simply open MySQL.prefPane to install it. This will add a MySQL pane to your System Preferences application. Within this pane you can easily start up and shut down your MySQL installation and you can define if you want MySQL to automatically start when your system boots.